Tutorial: Easy Witch Hat Headband
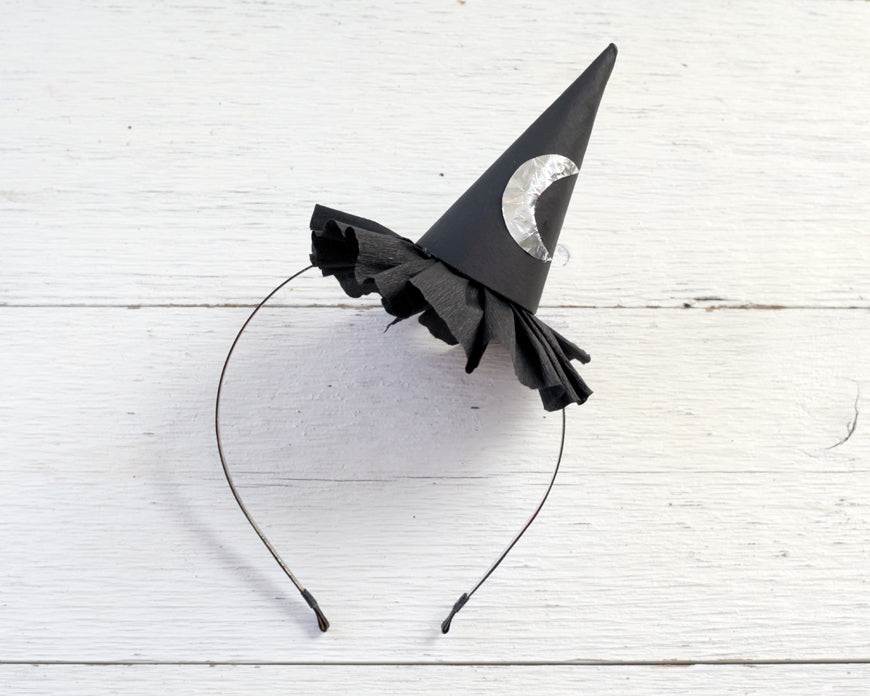
Here's an easy witch hat headband that you can make in a jiffy just before a Halloween party. It's super cute, too! I was invited to a festive fall Witches' Tea Party this weekend, and needed to whip up a quick costume to look the part. This witch hat headband took probably 15 minutes to make, (including the time it took for the craft paint to dry!) so this project is a real winner. It's made out of a simple paper mache cone, black paint, and some black crepe paper. The decoration is just made of foil (I actually used a burrito wrapper- one of my favorite secret craft supplies!) I was thinking, this would also make a really fun activity for a party. I sell the cones in the shop- just $5.50 for a pack of 6! So you can make a bunch of hats on a budget. Supplies:
- 4 inch paper mache cone
- Black craft paint
- Black crepe paper
- Paint brush
- Heavy duty black thread, and large needle
- Scissors
- Hot glue, and glue sticks
- Simple skinny headband
- Foil
Step 1: Paint the outside of the cone black, and set it aside to dry. Step 2: Cut across the end of a crepe paper fold, about 4 inches from the end. When you unfold it, you'll have a nice long 4 inch wide strip. You'll need about 2 feet of it to make the brim of the hat.

Step 3: Thread your needle, and begin a basic running stitch along one side of the crepe paper strip, about 1/4 inch from the edge. Gather the paper as you go, and stitch all the way to the end of the strip. Step 4: Even out the gathers, and pull the thread taught so that the gathers form a circle. Tie the ends of the thread together to hold the round ruffle in place.

Step 5: When the cone has dried, run a line of hot glue just inside the opening of the cone. Step 6: Push the center of the ruffled crepe paper circle inside the cone, leaving about 2 inches or so out. Press the paper against glue inside until it hardens. Then, you can fluff out the hat brim, making it sit flat.

Step 7: Decide if you want your hat to stand upright on your head, or off to the side like a fascinator. Run a line of hot glue along the headband where the hat will go, and press it onto the underside of the hat. Hold in place until the glue is totally hardened. Step 8: Embellish with a crescent moon if you like. Simply cut out the shape from foil, and apply to the front of the hat with glue. Now you're ready to party like a proper witch!

Easy peasy! As always, if you enjoyed this tutorial, share it! Pin:


