Vintage Style Spun Cotton and Paper Lantern Ornaments
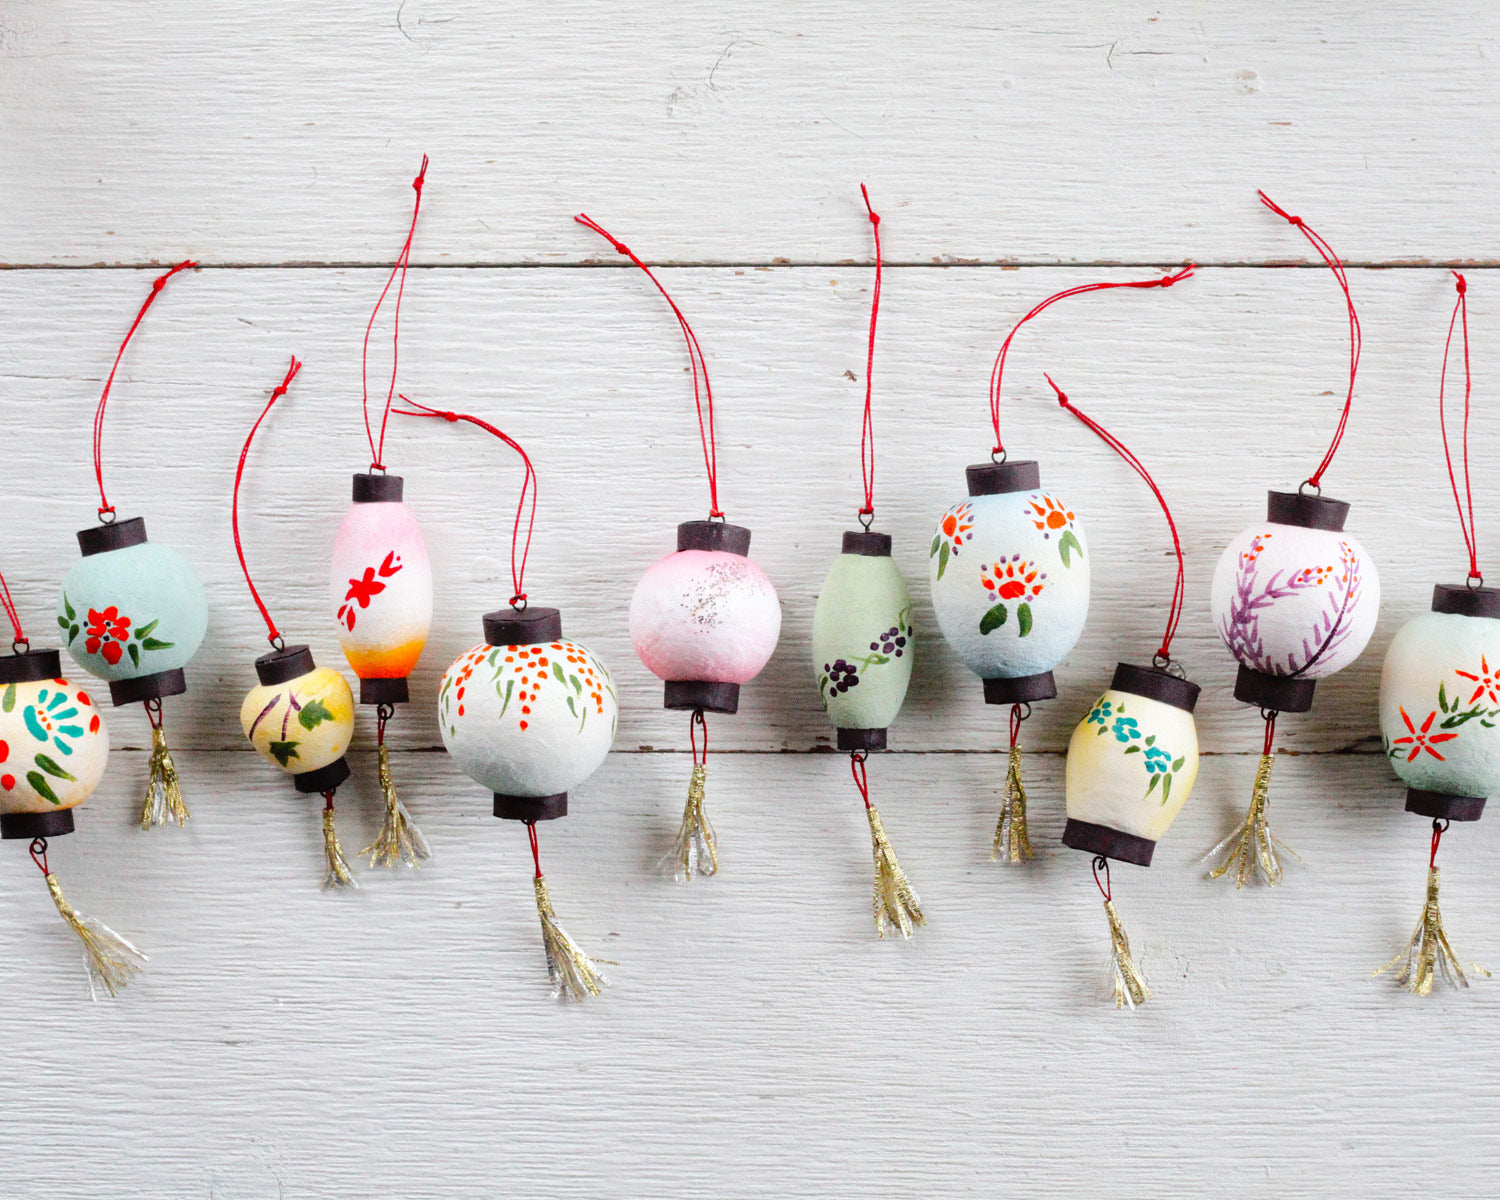
I have always loved the vintage lantern ornaments that were made in Japan for export in the 1950s. There were several different types made of paper, as well as the heavy painted glass bulbs for string lights. The combination of colors and delicate floral patterns are so beautiful, and I wanted to create a version of these mid century lanterns using spun cotton that I could hang on my tree.
Most of these I made by watering down acrylic craft paints to a point where they are nearly like watercolors, and would soak into the cotton. By moistening the entire ornament with paint-tinted water first, I could use the brush to blend the paints to give the effect of being lit from within. Later on, I experimented with using a Copic airbrush to make some really vibrant gradations. I had fun using both techniques to do the base coloring.
I practiced painting some of the floral designs on paper first, just to get a feel for it. Making the black paper caps was tedious at first, but after 3 or 4 I got it down, and I started making them assembly-line fashion. Making caps for the smaller size lanterns was a little fidgety, so I'd recommend starting with the bigger ones using 40mm balls and 58mm eggs for the forms.
Supplies:
- Spun cotton ball 40mm, spun cotton egg 58mm
- Bamboo skewers, foam block or jar for holding the skewers
- Acrylic craft paint in light yellow, and other light base colors, plus colors for floral designs
- Flat Paint brush, Thin Liner Brush, water bowl
- Black construction paper
- Scissors
- Glue stick, liquid glue
- Red string or cotton cord
- Gold/silver floral foil or candy wrappers
- Large Pin
- 24 Gauge floral wire
Step 1:
Insert a skewer into the spun cotton ball or egg to use as a handle. Mix a tiny amount of yellow paint into the water to tint it. Brush the tinted water over the entire surface of the spun cotton. Add a few drops of water to the accent color to water it down. Lightly brush the accent color on the top and bottom of the lantern. Then, blend the color toward the center of the lantern, using water to feather and soften the edges. Set the skewer up in a jar or stick into a foam block to allow the shape to dry fully.
Step 2:
Paint floral or geometric designs on the lanterns using undiluted paint and a thin liner brush. You can freehand a motif, or look up vintage examples for inspiration and draw them in pencil first. Practice on paper beforehand if you choose. Patterns can be single sided, or continue around the lantern. Let dry.
Step 3:
Cut a half-inch wide strip of black construction paper. Fold it in half lengthwise, and then unfold. Use sharp scissors to snip a wide fringe along the length, right up to the fold. Find something cylindrical to model the caps on. I used a glue stick cap for the 40mm ball and 58mm egg, and the end of a marker for the smaller shapes. Wrap the un-fringed half of the paper strip around the cylinder, folding the fringe over the top. It will naturally follow the curve of the shape. Allow the end to overlap by about 1/4 inch, and snip off the rest. Glue the end of the strip in place. Cut a circle the same size as your cylinder, and glue it on top of the cap. Press it down, and then let it dry. Use a thick pin to poke a hole in the center. Use this method to make two caps for each lantern.
Step 4:
Snip two short lengths of 24 gauge or thinner floral wire. Wrap each wire around a skewer to make a loop, and twist the ends together. Make a tassel to hang from the lantern. You could use pre-made jewelry tassels, or make them out of embroidery floss or foil. I am using floral foil that is gold on one side and silver on the other. To make a foil tassel, cut a small rectangle of foil, about 1 x 1 1/4 inches, snip a fine fringe about 3/4 up to the top, and then roll up the uncut edge. Cut an inch of red string, insert into the wire loop, fold it in half, and then glue into the tassel. Feed the twisted ends of the wire through the paper caps. Use the pin to make a hole in the bottom of the egg or ball. Glue the caps in place on either end. Add hanging loops to the tops of the ornaments.

