How to Make a Sugared Orange Spun Cotton Ornament
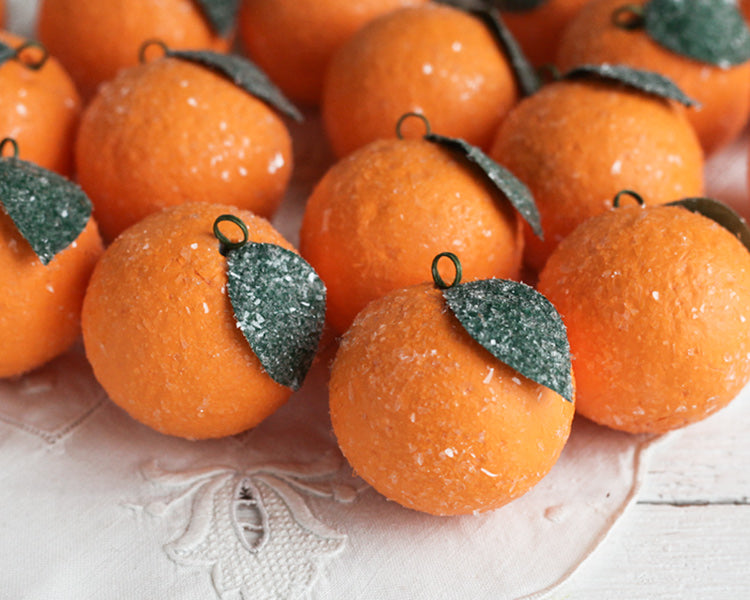
In this tutorial, I am sharing my process for turning a plain spun cotton ball into a beautiful orange ornament. Spun cotton ornaments of this type were popular in the 1920s and 30s, and fruit themes were especially prevalent. I decorate my Christmas tree each year with hundreds of vintage and handmade fruit ornaments, and the colors so vibrant and beautiful. Personally, I think this Christmas orange looks lovely with or without the glitter. For this ornament I am using a touch of German glass glitter, but any type of clear glitter will provide the same effect. You can fully douse the orange with glitter for thick, sugary coating, or apply it lightly as I have done here for a subtle look.
I also sell completed sets of the oranges here in the shop, and they make wonderful gifts as well.
Supplies:
- 45mm spun cotton ball
- spray bottle with water
- bamboo skewer
- jar or foam block
- 24 gauge green floral wire
- green cardstock or thick paper
- scissors
- white glue
- paint brushes
- orange craft paint (I am using Apple Barrel in 'apricot')
- clear glitter + bowl & spoon
Step 1:
Select a tool for dimpling the surface of the spun octton ball. The tool should have a rounded point with a smooth texture so that it will not catch on the cotton fiber. I am using the tail end of a small plastic paintbrush handle. Use the spray bottle to apply an even mist of water on the entire surface of the spun cotton ball. Once lightly moistened, press the tool into the surface to create a dimpled texture. The dimples will shrink slightly as the ball dries, so make them a little deeper than you would like to see in the finished ornament. Once the surface is dimpled, let the ball dry completely.
Step 2:
Insert the skewer into the ball to use as a handle. Paint the entire surface with orange craft paint. Set the skewer up in a jar or a foam block while the paint dries. Apply a second coat if necessary.
Step 3:
Brush a light, even coat of white glue on the entire surface of the ball. Take care to not get glue on the skewer. Brush off any drips or excess glue. Then, holding the ball over the glitter bowl, use the spoon to sprinkle a light layer of glitter over the surface. Turn the ball as you work to apply glitter to the whole ornament. Set it up to dry.
Step 4:
Cut a small leaf out of green cardstock or thick paper. Glue a short, roughly 2 inch piece of floral wire to the back of the leaf with the stem extending past one end. After the glue has dried, gently bend the leaf into a curve. Coat the top side of the leaf with glue, and sprinkle glitter over the top.
Step 5:
Create a small hanging loop for the ornament. Cut a roughly 2 1/2 inch length of floral wire. Wrap it twice around a paintbrush handle to make a round loop. Twist the ends of the wire together.
Step 6:
Apply glue to the leaf's stem, and insert it into the hole at the top of the ornament. Then, apply glue to the twisted ends of the hanging loop, and insert it into the ornament as well. Let dry.
Products featured in this tutorial:
45mm Spun Cotton Balls for Crafts

