1920s Style Paper Mache Halloween Pumpkins
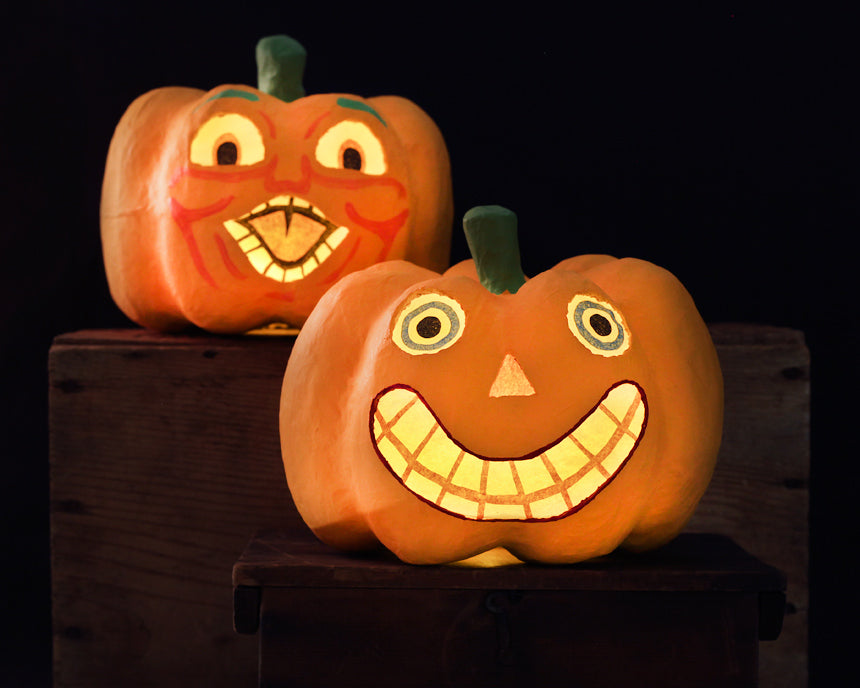
I love the old paper mache Halloween pumpkins that were made in Germany back in the 1920s and 30s. They were made of pressed paper pulp that was put into molds, dried, and then painted in vivid colors. Some were candy containers, and some were lanterns. There's something actually creepy about those goofy, surprised-looking fun house faces. Collecting the actual antique Halloween pumpkins can get VERY expensive though because, like most old paper items, they are increasingly rare. So, I thought it would be cool to make some vintage style paper mache Jack-o-lanterns of my own! These new craft pumpkins I have in my shop are fantastic. They are made out of thick paper mache, and are hollow so they can be carved with a serrated knife. It's no more difficult than carving a real pumpkin, but this one will last from year to year.
Supplies
- Paper Mache Pumpkin
- Serrated Steak Knife
- Scissors
- Paint Brushes
- Orange, Green, Red Paints
- White, Blue, Red, Black Tissue Paper
- Glue Stick
- Pencil
- LED Flameless Tealight Candles
Step 1: Use a serrated steak knife to cut out a hole in the bottom of the pumpkin that's just big enough so you can put your hand through it.

Step 2: Draw the simple face on the pumpkin with a pencil. Because of the shapeliness of these pumpkins, it's best to set the eyes on the raised portions, and let the nose fall in the crease area.

Step 3: Cut out the eyes and nose. If there are any 'fuzzies' along the cut edge, you can snip them away with small scissors. Step 4: Cut out the mouth, and try to keep it in one piece. You'll use the cut bit as a template later when you make the tissue insert. Step 5: Paint the pumpkin orange, and let dry. It will take 2-3 coats of paint for it to become opaque.

Step 6: While the pumpkin is drying, cut out a double-thick square of white tissue paper that is a little larger than the eye holes you cut out of the pumpkin. Then, cut out a circle of blue tissue that is just smaller than the eye holes of the pumpkin. Snip out the center of the blue circle to make an "O." Use a glue stick to apply it to the center of the white square. A small circle of black will complete the eye. Repeat to make a second eyeball. Step 7: Cut out a rough triangle shape from the red tissue that is just larger than the nose of the pumpkin.

Step 8: The mouth is the only real tricky part. You could just cut out "teeth" and apply them to a red base, but then the mouth will glow pink when it is lit up. So instead, I am applying a mouth red design on top of white so that the teeth glow brightly. To do this, use the mouth part you cut out as a template, and trace around it lightly with a pencil. Then, cut it out, leaving about 1/4 inch extra around the traced line. Starting at the bottom, begin cutting out blocky teeth shapes, and leave a thin strip between each one. Continue around to the top row. It's ok if the teeth look a little wonky - it will just add personality. Once the shape is complete, use the glue stick to tack it down to a piece of white tissue that's larger than the pumpkin's mouth opening. Step 9: Once pumpkin has dried, line the mouth in red paint, and paint the stem green.

With all of the paint dry, it's time to place all of the tissue pieces. Step 10: Apply the glue stick all around the edges of the mouth tissue. Insert it through the mouth, and reach your hand in through the base of the pumpkin. Carefully line it up, and press against the inside of the pumpkin to form a seal all the way around the tissue.
Step 11: Then, do the same thing with the nose and eyes. These are a bit easier to place than the mouth.

Ha! Isn't he fun??! I made a second style, which is a little more complex. For him, I added a little bit of paint to his face to give him a real wild expression.
You could also carve out the top of the pumpkin to make a candy pail. Really, really fun! Here they are glowing with flameless LED tealights inside:
Hope you enjoyed these fun vintage style Halloween pumpkins! As always, if you love it, share it:


