Painted Paper Mache Halloween Cat
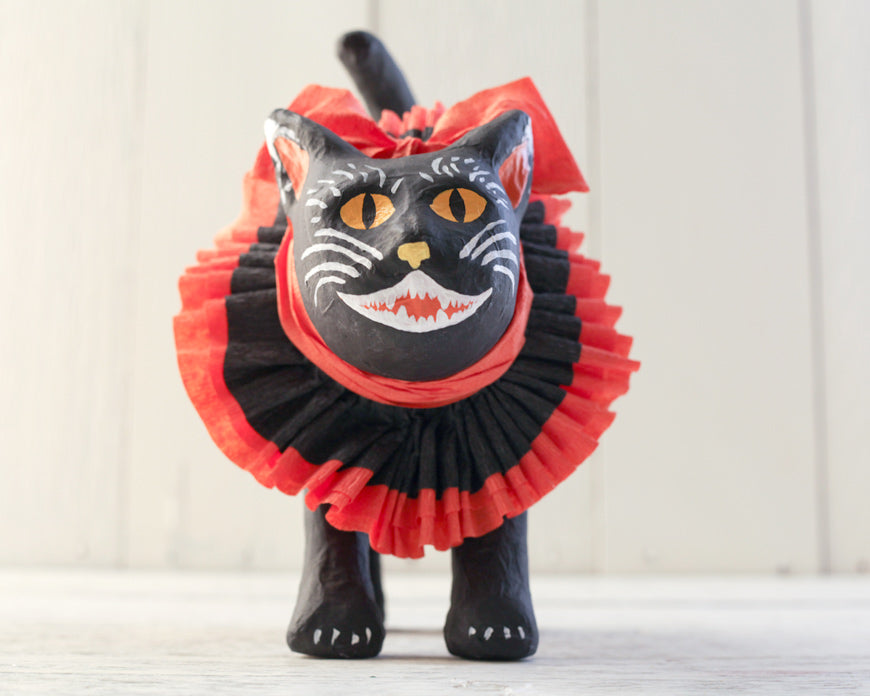
Make a painted paper mache Halloween cat to guard your candy stash! This 1920s style kitty has a folky face, and a charming ruffle of crepe paper around his neck in classic orange and black. I sell the plain paper mache cats here in my shop, and they are ready to be decorated. It's a great project to do while the pumpkin bread is baking!
SUPPLIES:
- Paper mache Halloween cat
- Craft paints in black, white, yellow, and orange
- Medium paint brush, and small liner paint brush
- Crepe paper streamers in orange and black
- Needle and thick black thread
Step 1: Paint the entire cat black. Let dry completely.

Step 2: Paint an orange mouth shape. My kitty is hissing, so he's got his mouth open a bit. Step 3: Paint two almond-shaped eyes. Once dry, these shapes will probably need a second coat of paint to become opaque. In the meantime, we can add other details.

Step 4: Use a small liner brush to paint "eyebrows." These are just short strokes which will help give kitty a shocked expression. Then, add some white details to the tips of his ears. Step 5: Add claws. Step 6: By now, you can probably go back and put a second coat of paint on the eyes and mouth. This is also a good time to give kitty a nose, orange in his ears, and some whiskers. Let all of these dry before moving on to the next step.

Step 7: Use the small liner brush to paint in some jagged white teeth Step 8: Then add skinny black pupils in the eyes. Let dry. Step 9: To begin his collar, cut two 4-foot lengths of orange crepe paper streamers, and one 4-foot length of black. Layer them so that they are stacked orange-orange-black, staggered about 1/4 inch. Thread a needle with thick black thread, knot at the end, and start a long running stitch along the entire length of the crepe paper. The needle needs to go through all three layers of paper.

Step 10: When you finish sewing through the entire length of paper, pull the thread to ruffle the paper. Tie the thread ends together around the cat's neck. Step 11: Spread out the ruffle until both ends meet behind the cat's ear. Bend the ruffle forward. Step 12: Take a strip of orange paper, and tie a small bow. Use the tails of the bow to wrap around the cat's neck like a collar, and tuck in the ends.

Oh kitty!

Hope you enjoyed this fun fall project! As always, if you love it, share it:


