Tutorial: Retro Silver Bells
Last year I decorated one of my Christmas trees with some vintage paper mache bells that were made in Japan in the 40s-50s, and I just loved how they looked hanging off the tips of the branches. I wished I had more! Then, this summer I had just left an estate sale which was kind of slim pickings, and on the way back to the car I saw a garage sale at the end of the block. I stopped in, and the lady was super nice, and she had a table full of really fun 1950s Christmas stuff (YAY!) I got a whole armload of things from her, including a couple gallon bags full of paper mache bells!! These were even better than the mica ones I had on my tree last year because they were covered in silver foil, and had plaster accents that shimmered with glitter. Along with the vintage ones I've collected, I wanted to do some handmade ones that could coordinate. This project is really simple, and you can knock out about a dozen of them in an hour. The secret to making these quickly is to use a thin foil with a paper backing. I'm using burrito wrappers which are foil on one side, and paper on the back, and I got a big pack of them at the restaurant supply store. You can use regular kitchen foil, but it does tear a bit more easily, so that's why the paper backing is useful - it just holds up better while you work with it.
Supplies:
- Paper mache bells
- Foil (or burrito wrappers!)
- White glue
- Paint brush
- Awl
- Spoon
- Scissors
- 22 gauge white floral wire
- Plaster of Paris
- Clear coarse glitter
- Egg carton
Step 1: Remove the hanging loop from the top of a bell. Hold it from the inside, and use a paint brush to coat the entire outside with white glue.

Step 2: Take a piece of foil, roughly 9 x 9 inches, and place the bell in the center, and press the foil against the sides of the bell. It will fold and crease, so press the folds flat as they form. Step 3: Cut the excess foil away from the bell, leaving about a 1/2 inch flap around the opening. Step 4: Paint a stripe of glue just around the inside rim of the bell.

Step 5: Fold in the edge of the foil, and press it against the inside of the bell. Step 6: Use the back of a spoon to smooth and flatten the foil. Step 7: Cut a short length of floral wire, wrap it around an awl or pencil to make a loop, and twist the ends to form a hanger for the top of the bell. Use an awl to poke a small hole in the top of the bell, insert the hanging loop, and then reach inside to spread out the tails of the wire to hold it in place. Step 8: Mix up a small batch of watery plaster in a disposable container. I mix about 1/4 cup at a time, so that I can use it all up quickly since it will begin setting immediately. It should have enough water in it so that it's a runny consistency. Use a paint brush to apply some plaster over the foil's edge inside the bell. This is to keep the plaster from getting under the foil.

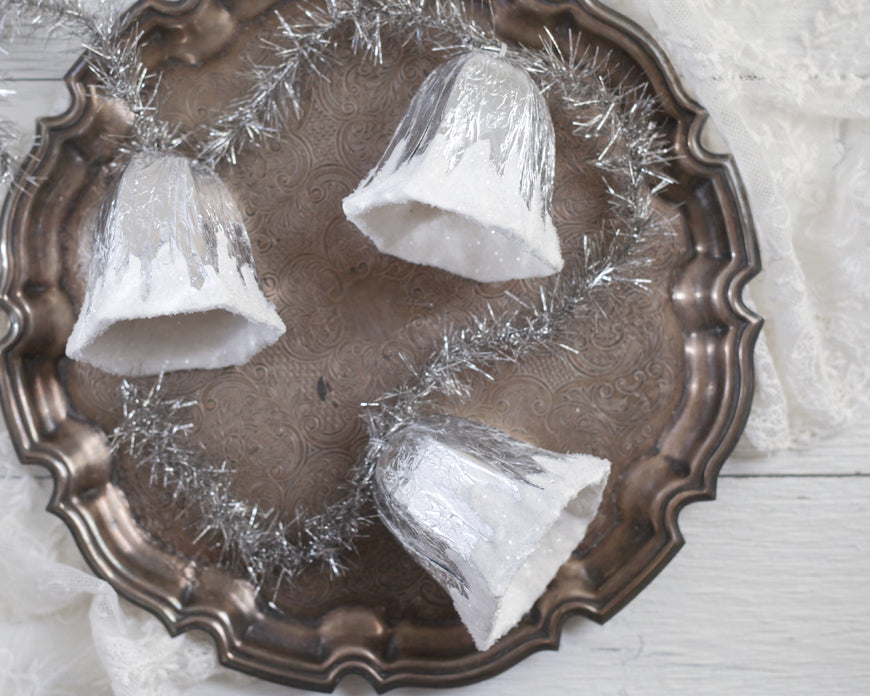
Step 9: Pour some plaster inside the bell, and rotate it to coat the entire interior surface. Pour out the excess back into the plaster container, and shake out any drips. Step 10: When the inside of the bell is coated with plaster, set it in an egg carton until the plaster is dry. Step 11: Use the side edge of a paint brush to apply a decorative frosty edge at the bottom of the bell. Simply make uneven "peaks and valleys." Shake off any drips, and set the bell back in the egg carton to dry.

Step 12: When the plaster is completely dry, paint the plaster parts of the bell with white glue, and sprinkle with clear glitter. Let dry.

And there you have it! Hang your silver bells on the Christmas tree, dangle them from glass bead strands or ribbons in the window, or make a garland with them to adorn a mirror. Lovely, right?


As always, if you love it, share it! Pin:


