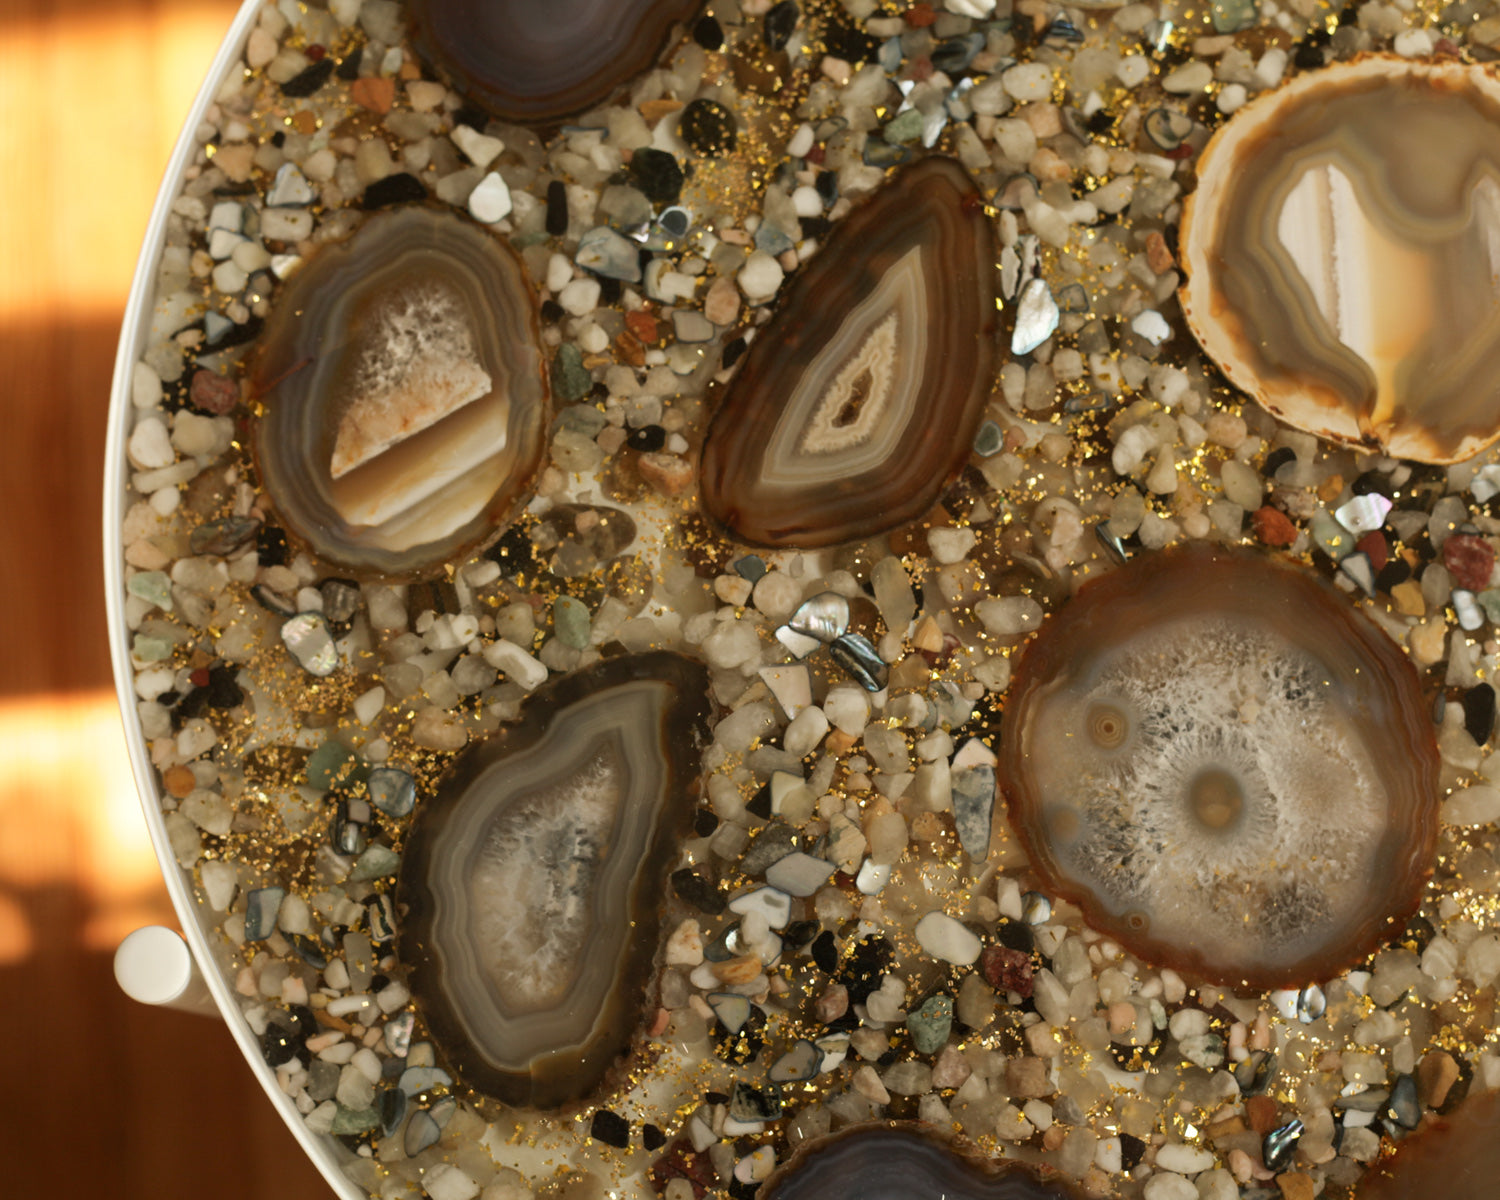
Making a Retro Glam Agate Slice Epoxy Resin Table
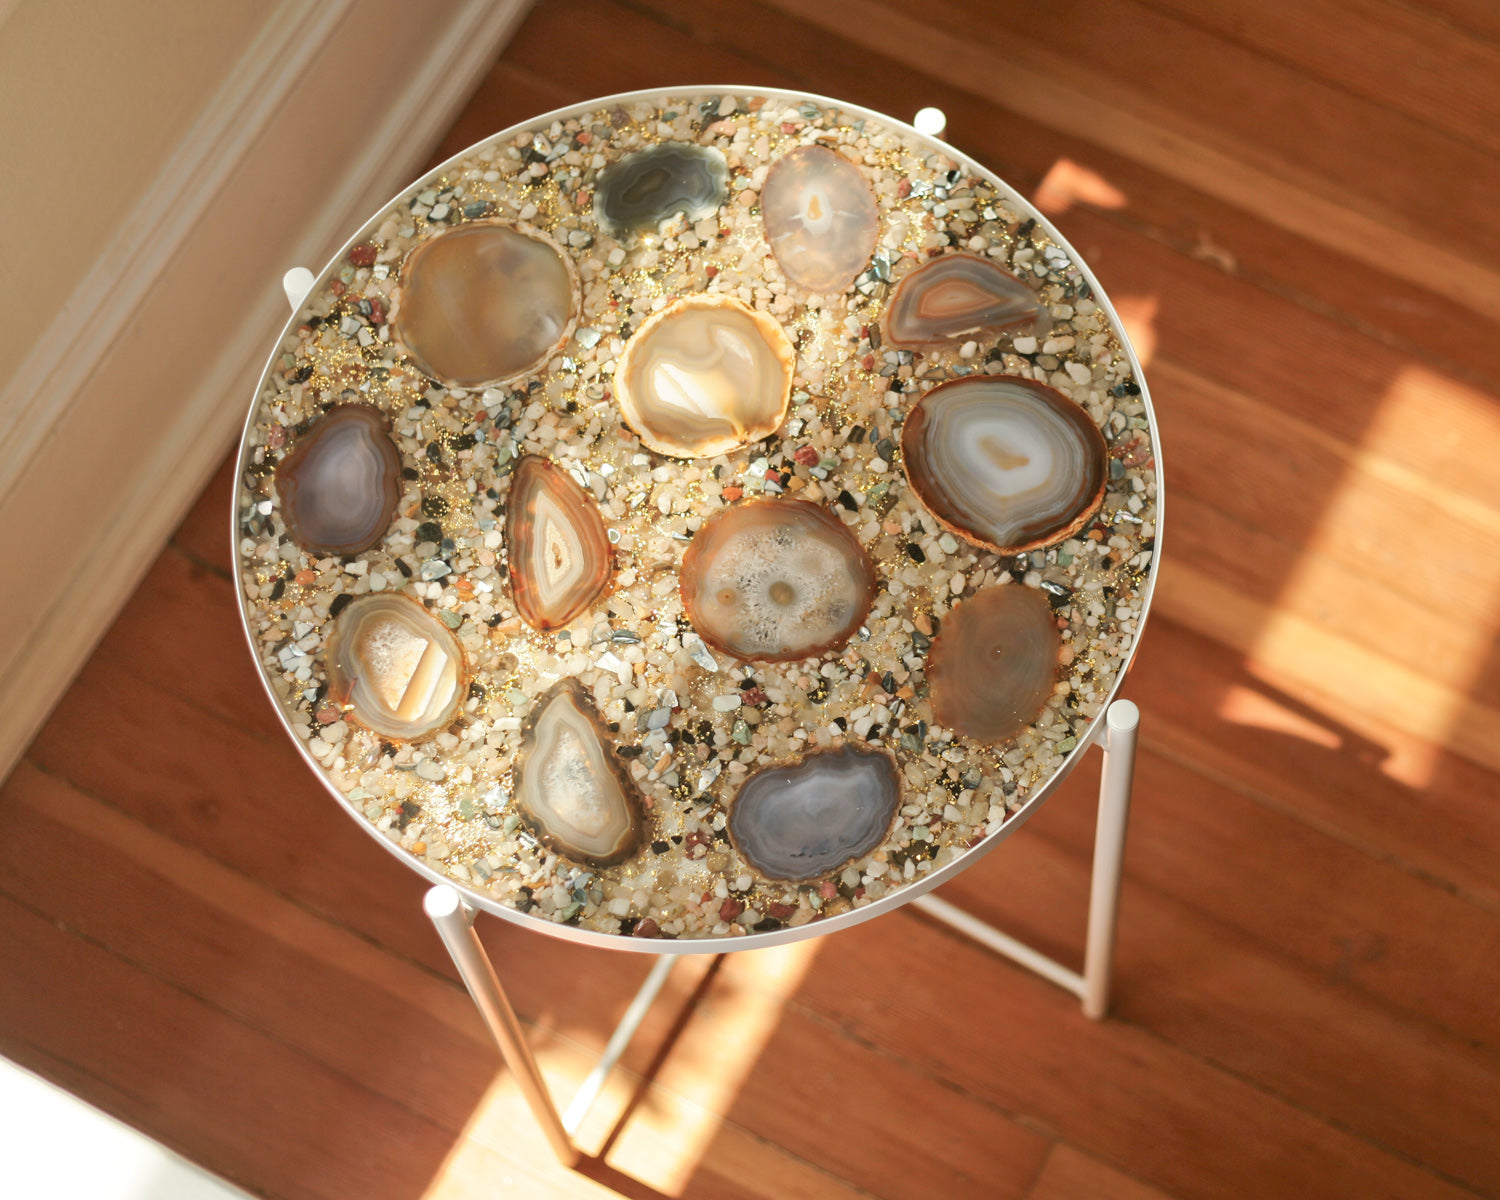 Every summer I try to learn a new creative skill, or make something with materials I've never used before. Making this agate slice table with epoxy resin was an ambitious project, and I wasn't really sure how it would turn out. I'm so glad I tried it! The finished table is amazing- totally unique, and sparkling with vintage glam. This is not a five-minute dollar-store craft, that's for sure. Including the cost of the Ikea table itself, I think I spent about $135 in total. I've seen similar rock slice tables by West Elm-type fancy furniture places that go for hundreds more, so I guess if I'm comparing my table to theirs I did alright. The agate slices alone go for $2-3 apiece online - I got mine on Ebay. The Ikea 'Gladom' table is $25, and actually ended up being super perfect for the project because the tray top is removable from the table, and is made of one piece of metal without any seams, so there was no chance of resin leaking out the base.
Preparation and planning was everything with this project. I bought this Pro Marine resin that is designed for table tops. It's not the cheapest option, but I wanted it to be hard and durable so that the table would be long-lasting and usable. I bought the gallon kit, which is 64 ounces of part A and 64 ounces of part B. I had just a little bit leftover when I was finished. The full amount needed depends on how much stuff you cram into the table. The rocks displace the resin, so more or less may be needed depending on what's going inside. I thought it was a good idea to make sure I had more rather than less. I followed the manufacturers instructions in terms of how much to pour at one time, and how long to cure between layers. For this resin, the recommendation was to do layers no more than 1/8" thick, and to cure 4 hours before pouring the next layer. So this meant I ended up doing four pours over 12 hours. I got up early, and had that first pour in the tray around 6:45 am. The last pour was done after dinner. Warm weather is essential for working with resin- it needs to be 75°F for the resin to cure properly.
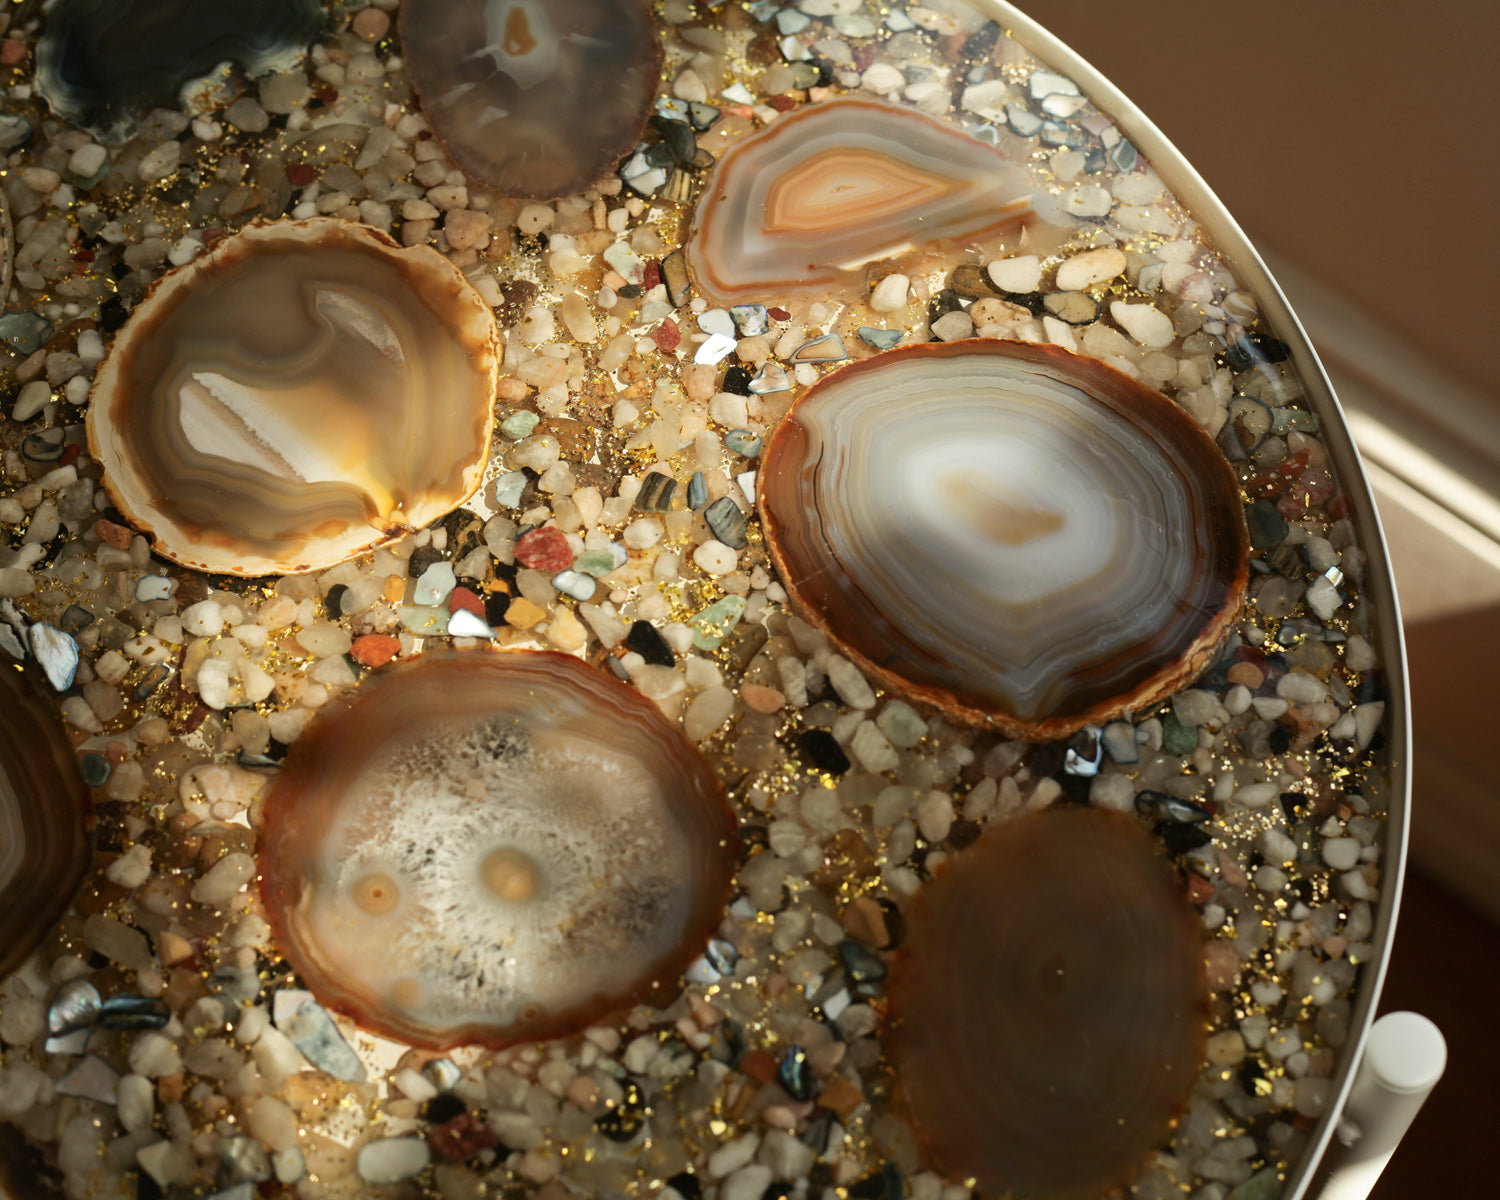
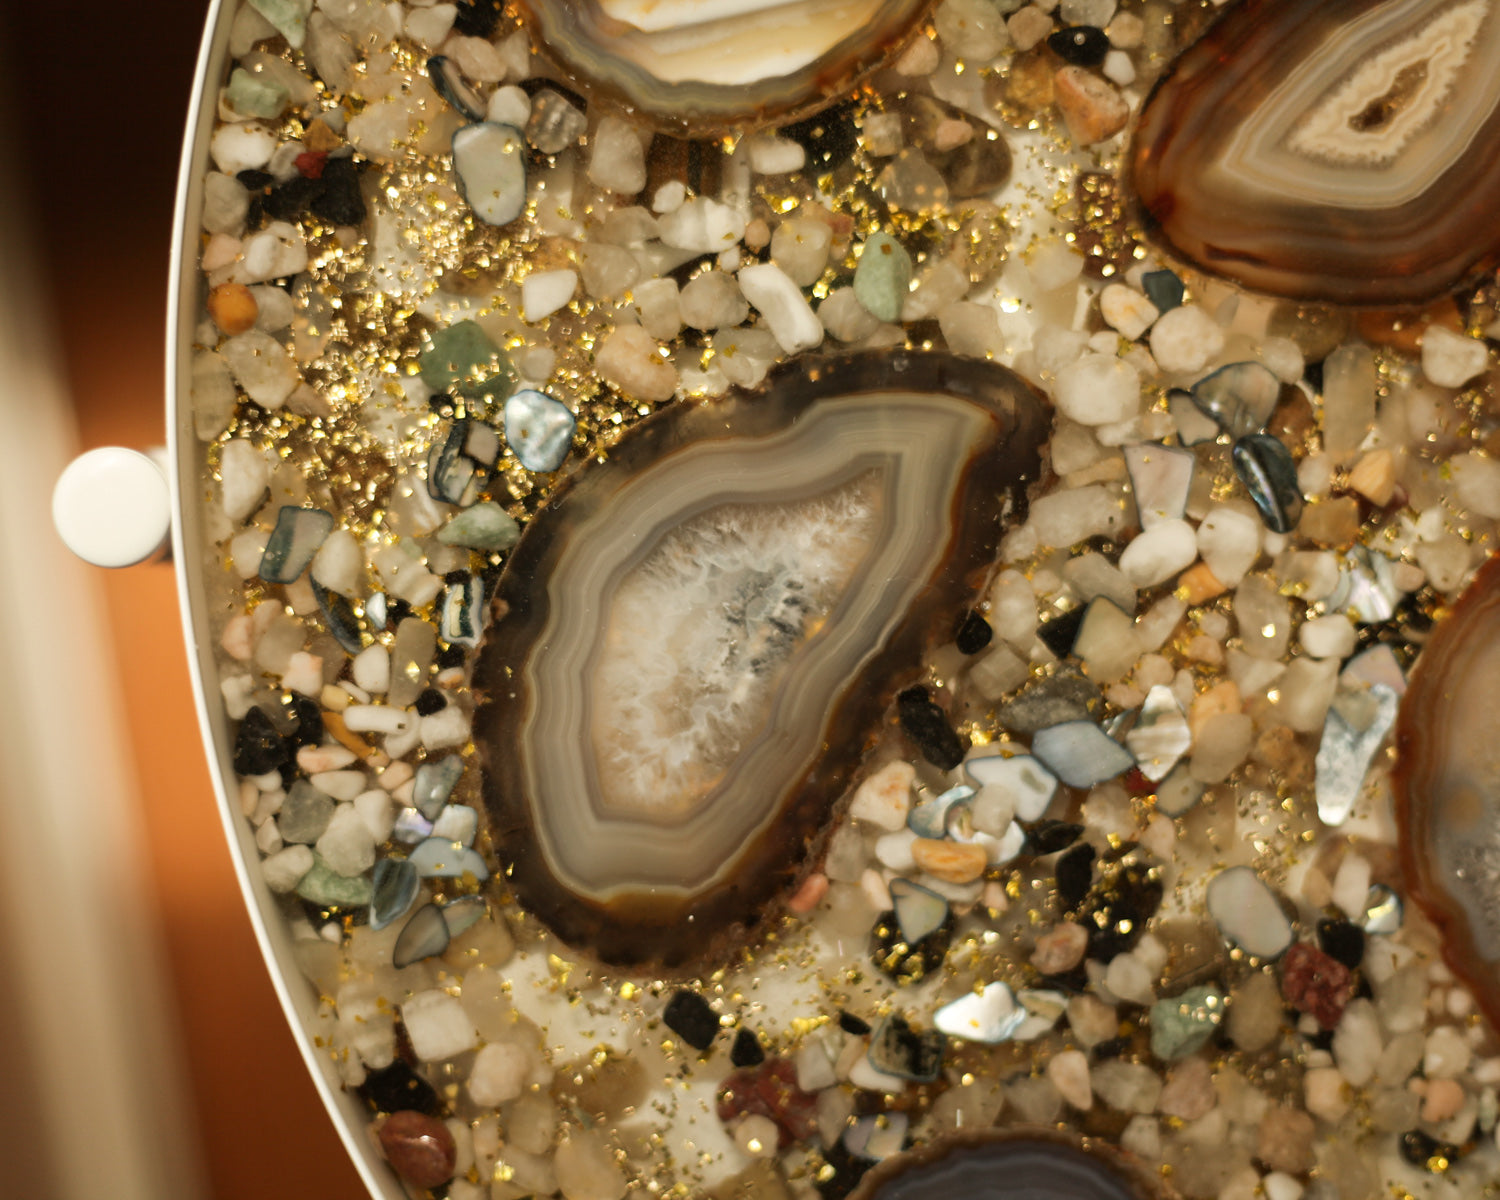
I did a little test run with my materials inside the lid of a peanut butter jar before doing the table itself. I did this because I wanted to see how the shells and rocks looked under the resin, and also if the glitter I was using (which was vintage) would bleed its color. The glitter was fine, but I found that the shells I was using from the craft store had been dyed blue, and they did leech a little color. So before I began I washed all my shells to let out the color, and let them dry for a week. I used natural agate slices, but I know some brightly colored agate slices have been dyed, and I don't know how those react to the resin. Tests are always a good idea with expensive projects.
There are a LOT of variables in this project, so I will just share the steps I took given the materials I used.
As Amazon Associates we may earn from qualifying purchases.
Supplies:
- Ikea Gladom Table
- Table Top Epoxy Resin 1 Gallon Kit
- Heat gun or mini torch
- Embellishments: agate slices, pebbles, small stones, crushed shells, glitter
- Additional items: lots of disposable plastic measuring/ mixing containers, wooden stir sticks, drop cloths, disposable gloves, painters tape, paintbrush, cardboard box large enough to cover tabletop
Step 1:
Preparations- I picked a day where the weather report was for temps in the 80s. I set up an area with a drop cloth, and a folding table that I would use a work surface. Before starting anything I got out a level, and propped up the tables legs to achieve a perfectly level surface so that the resin would set evenly. All of my materials were organized and set up within reach, like a surgical station ready to go.
I covered the outside rim of the table top with painter's tape so that it would be protected from resin drips. The Gladom table top has this one tiny hole pierced in the side, and the tape covered that too.
Step 2:
For my base layer I thought I would do a layer of my biggest pebbles (about 1/2 inch in size) and a little glitter. I spread the pebbles on the bottom of the tray, and waited to put the glitter on until after the epoxy was in so it would appear to "float" between layers rather than sink to the bottom.
Mixing the epoxy:
For the first layer of epoxy I used 12 ounces part A and 12 ounces part B for a total of 24 ounces. I measured them into separate containers for this first batch, but later ended up measuring them into the same container to save on waste. Part A is thick and sludgy, so is harder to measure. I poured part A first, and then part B. I had my phone next to me with the stopwatch, and started timing once I had A and B poured together.
I stirred with gusto for 3 minutes, frequently scraping down the sides of the container. After 3 minutes I poured the mixture into a clean container. This is per the instructions for the resin, and I would assume the reason is to incorporate any unmixed bits. I stirred for a further 3 minutes.
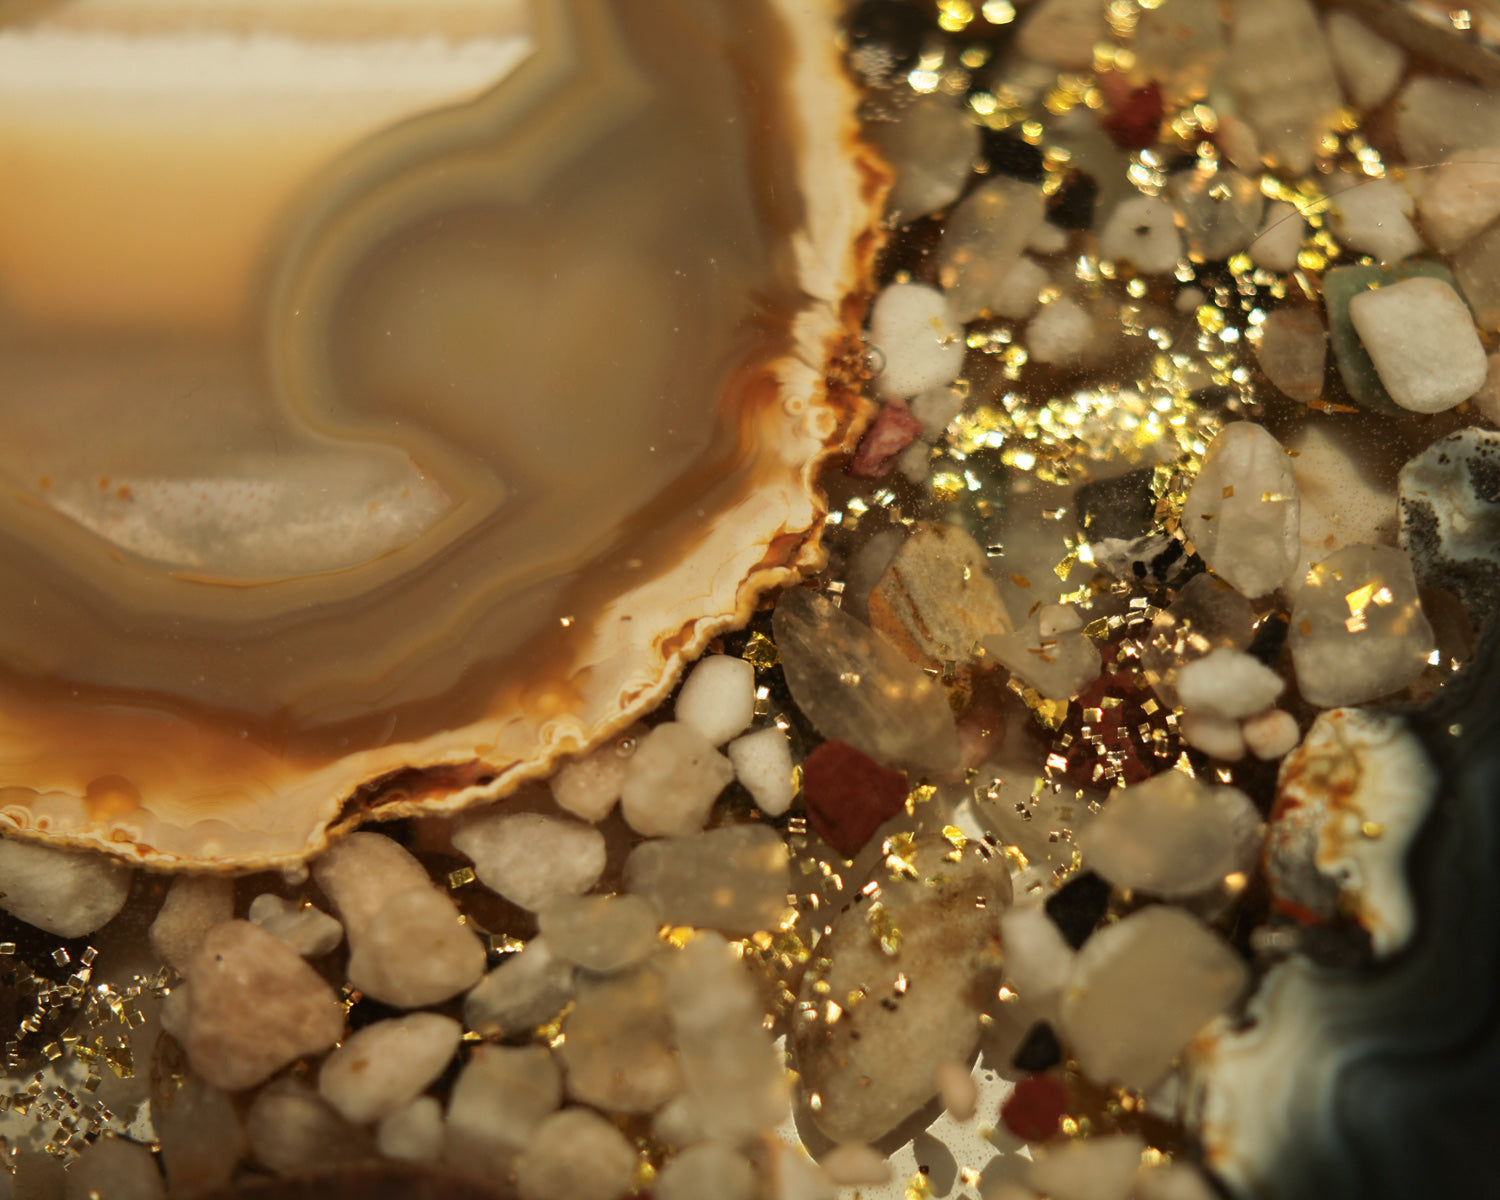
The resin starts to heat and cure after 8 minutes, so there is NO downtime after mixing. I poured it straight into the tray over the pebbles, and used my stir stick to spread it to the edges. Once spread I turned on my heat gun to the low setting, and just passed it along about 8 inches over the surface a few times. (I have just a cheap-o $16 no frills heat gun.) You can visually see the bubbles in the epoxy rising and popping, and it clears of bubbles within seconds. Once I had removed all the bubbles I sprinkled on two kinds of gold glitter from my vintage glitter collection. The glitter gradually moved itself around forming a cool pattern- almost like veins of gold. If you want it to be more of an even distribution, you could stir it into the resin before heat-gunning.
I had my cardboard box at the ready, which I had earlier cut down to just about 2 1/2 inches tall, and it was wide enough to cover the table top fully. I set it over the table top and left it to cure for 4 hours.
Step 3:
Next, I did a single layer of epoxy with no embellishments. I did this because I wanted there to be a little space between the pebbles and my agate slices. The agates are translucent, so I thought the space between layers would let you see through them a little better.
This layer I mixed just as before, using another 12 ounces part A, and 12 ounces part B.
I let it cure another 4 hours after pouring.
Step 4:
Now I got to arrange my pretty agates. I had sort of worked out where I wanted them beforehand. The last layer of resin was just slightly sticky, and I figured I might not be able to move them very easily once they were placed. I arranged them, and then got to work filling the gaps between with other stones, gravel, and my shell bits. I sprinkled on more glitter, and then used a paint brush to sweep off the agates.
For this layer I mixed 16 ounces of part A and 16 ounces of part B. I think I was pushing the thickness limit a little here because I'm pretty sure there were spots that were closer to 1/4 inch, but it did work. This amount was enough to fill the gaps, and also put a light coating across the tops of the agate slices.
Once poured, I used a wooden stick to stir and shove around the gravel/stone mixture. The idea was that I would create little gaps to where you could see down to the lower levels. So there are areas of thick gravelly-glittery stuff, and areas where is clear down to the bottom.
I let this cure for 4 hours.
Step 5:
So now it was around 6:45 pm, and I had just about 1/8 left unfilled in my tray. I wanted to be absolutely sure I had the last layer poured before bed because the manufacturer does not recommend adding layers after 6 hours. I mixed up a batch with 16 ounces part A and 16 ounces part B, and poured it into the tray slowly, using the stick to push it out from the center toward the edges. I was extra careful not to overfill and make a mess. I ended up having a lot of extra epoxy in the mixing container that I didn't need.
I let this final layer cure for 72 hours before setting it up on the table base.


